Bug Village - Free Craft Pattern


* Home  
Beaded Crafts  
Kids Craft Patterns  
Lighted Craft Projects  
Other Craft Instructions  
Jewelry Craft Projects  
Wearable Projects  
Plastic Canvas Projects  
Other Holiday Craft Ideas  
Christmas Crafts  
Halloween Craft Projects  
Fall Craft Ideas  
Easter Craft Instructions  
   
* Contact Us  
   
 
Please help support our site by visiting the sponsors in our ads.


Place your ad or website information on every page of our website. Contact us for more details.

Your donations help us to be able to add more free craft patterns to this site for you. We Thank You.


Bug Village - Free Craft Pattern


Contributed by Amanda Formaro, with permission

Here's a great craft for almost NO money! All you need are a few sticks, some acorn tops, rocks, and imagination! These darling little critters have a home of their own in this cute craft.


Materials Needed:
  • Sticks in various sizes
  • Acorn tops
  • Smooth rocks in different sizes
  • Hot glue gun
  • Paint brush
  • Household sponge
  • Stylus or toothpick
  • Small woodsie sign
  • Wiggle Eyes
  • Black fine tip craft pen
  • Matte acrylic spray sealer
  • Square or rectangular scrap of wood
  • Acrylic paint (in forest green, olive green, light brown, cream, light blue, light green, red, blue, orange, yellow, pink, purple, black, and white)

Instructions

Safety note: Parents should handle the glue gun as temperatures can get very hot and cause uncomfortable burns. Allowing older children to use the glue gun is entirely up to the parent, but child should always be supervised!

Begin by making sure the ends of the sticks are fairly flat. You can do this by simply smooshing the ends against the sidewalk. Use hot glue gun to adhere the sticks to the block of wood, then glue the acorn tops to the top of each stick.

Wash all the rocks and be sure they are dry before gluing on wiggle eyes. Glue the rocks to the wood in various places. Write the words "Bug Village" on a small woodsie sign and glue to the front of the piece of wood.

Paint the block of wood with forest green paint. When dry, sponge on some olive green paint to the forest green. Paint the sticks with light brown paint. Paint some of the acorn tops with light blue and the rest with light green. Glue the sticks to the wood, then glue the acorn tops to the sticks.

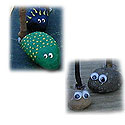
Wash all the rocks and be sure they are dry before you paint them. use various colors to paint the rocks: blue, red, purple, pink, green, etc. Use the stylus or toothpick to dot on spots and/or lines to your bugs. Dot on white spots for eyes, and a smaller black dot onto the white spot. Glue rocks in place when they are dry.

Create a sign by painting a small woodsie sign with cream paint, then shade the edges with light brown. Use black fine tip craft pen to write "Welcome to Bug Village" in the center.

The natural Bug Village is perfect for a boy's room while girls will adore the colorful bugs!


Please Read: After you have finished with this free pattern won't you please be kind and say thank you by clicking on just one of the ads on this page. It doesn't cost you anything and any revenue generated also helps you because it allows us to be able to share this site with you at no chargea and to be able to add more patterns and helpful information for you. We sincerely thank you!
 

Copyright © 2008-2024.  All rights reserved.