Cut out all of the pattern pieces as illustrated below. Click on the pattern piece for a larger, higher resolution image.
Stitch all of the pieces according to the pattern and attach the beads before assembling. You will want to do any of your own additions or changes to it before assembling also.
To stitch the pieces together use long stitches and overcast stitches on all of the outside edges except the long sides of the angel's six skirt sections (Piece A). Leave these edges and long edges of the sleeves (Piece B) unstitched for now.
Sew on your iridescent beads following the graph for bead placement and stitching.
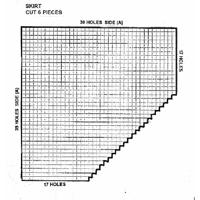 Figure A. Cut 6 pieces according to pattern.
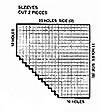 Figure B. Cut 2 pieces according to pattern.
 Wings. Cut 1 piece according to pattern.
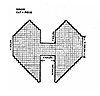
 Bodice. You need 1 piece with the center cut out as shown in the pattern.
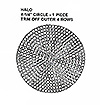
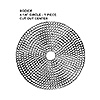
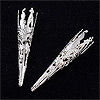
Halo. Only 1 needed. Trim off outer 4 rows.
STITCHING DIAGRAMS
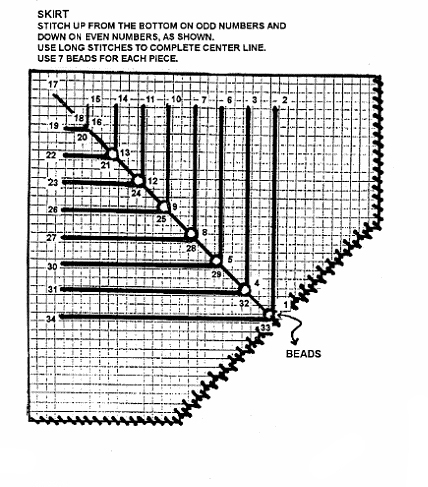
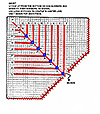 Skirt. Begin at the bottom of the skirt and stitch up on odd numbered rows and down on even numbers as shown. Use long stitches to complete the center line. Use 7 to 8 beads for each skirt piece. Add additional stitching and embellishments as desired.
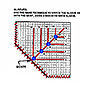 Sleeves - Use the same technique to stitch the sleeve as you did on the skirt. Use 4 beads for each sleeve and add additional stitching and embellishments as desired.
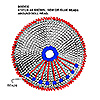 Bodice - Use the diagram to place your stitching and beads. Sew or glue beads around the doll's head.
 Wings - Stitch as shown on both sides of the wings. Sew beads and other embellishments onto the wings.
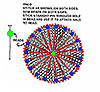 Halo - Stitch as shown in the diagram on both sides. Sew beads onto both sides. Use a long straight pin inserted into a bead and through the hole in the halo. Add a drop of glue to the end of your straight pin and push through angel's head. Let dry.
ASSEMBLING YOUR ANGEL
1. Stitch each gown section using overcast stitches to join both of the (A) edges, forming a cone like shape. Use the same method to form sleeves, joining (B) edges together on each sleeve.
2. Using a 12" piece of cord, lace through the empty top hole in each of the 3 cones then through one sleeve. Continue through the remaining 3 cones and sleeve. Pull tightly and knot off. Trim thread.
3. Using another 12" piece of cord, lace through the second hold from the bottom of each cone, pull together, knot and trim thread.
4. Stitch sleeves into place.
5. Glue hands in sleeves.
6. Glue bodice to top of gown and stitch front and back to the gown.
7. If using a doll pic head insert the wire into the center of the bodice. If using a wooden or styrofoam ball glue the head into place.
8. Attach the halo to the head with a straight pin. If using a wooden ball for the head glue halo into place.
9. Stitch wings to the bodice.


 3 Sheets of 7 count Plastic Canvas.
 2 - 4 1/4" to 4 1/2" Plastic Canvas Circles
 32 yds of Metallic Cord
 32 yds of 1/8" Satin Ribbon in the color of your choice.
 154 - 4 to 6mm Iridescent Beads
 1 1/2" Wooden Ball or Knob Paint your ball a flesh color and draw facial features on it with a permanent marker.
 1 1/4" to 1 1/2" Styrofoam Ball Paint your ball a flesh color and draw facial features on it with a permanent marker.
 Metallic Pipe Cleaners for Doll Hands
 A good quality beading thread, like Nymo.
 Straight Pins
 Hot Glue
 Glue Sticks
 Figure A.
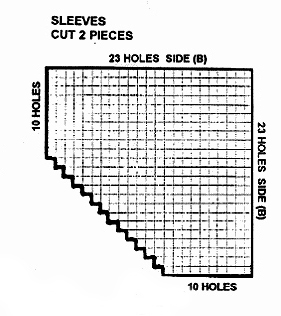 Figure B.
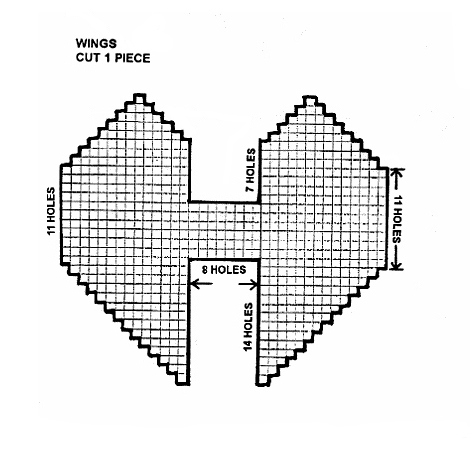 Wings.
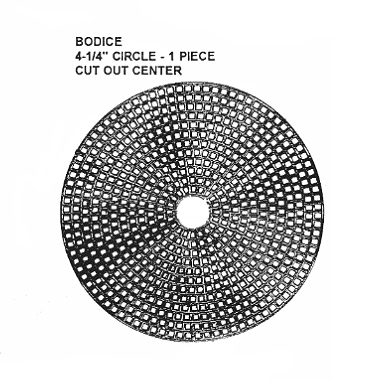 Bodice.
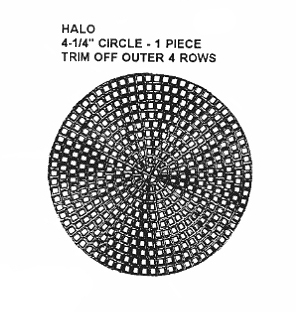
 Skirt.
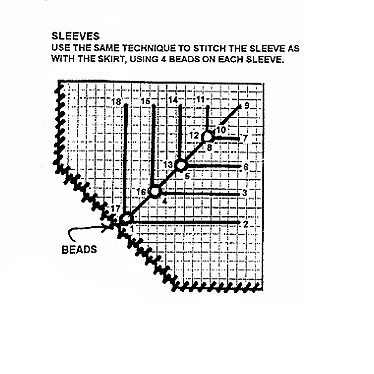 Sleeves -
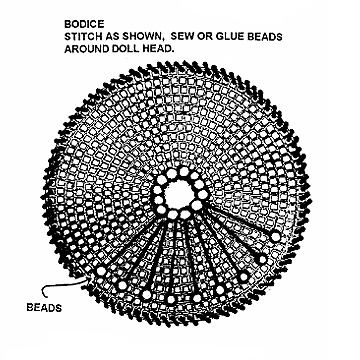 Bodice -
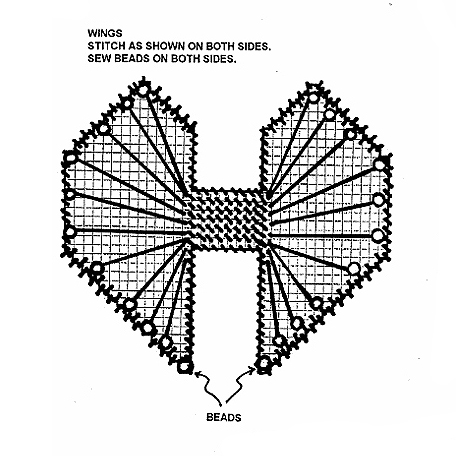 Wings -
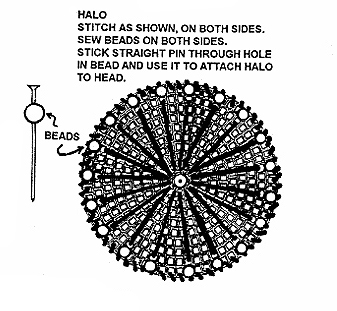 Halo -